Here you will find the main purpose of this site: documentation, cheat sheets, and tutorials.
This is the multi-page printable view of this section. Click here to print.
Documentation
- 1: Random Notes
- 1.1: Bash Globbing'
- 1.2: Safer bash scripts with 'set -euxo pipefail'
- 1.3: Scratch Pad
- 1.4: Pulumi
- 2: Encryption
- 2.1: OpenSSL Cheat Sheet
- 3: Git
- 3.1: The Working Tree and Stashing
- 3.2: Git Tagging
- 3.3: Git Commands
- 3.4: Git Configuration
- 3.5: Git Branching
- 4: Kube Bench
- 5: Python
- 6: Markdown
1 - Random Notes
A scratch pad for random notes
1.1 - Bash Globbing'
Explanation of globbing in Bash
The following is a brilliant explanation from Yogesh Umesh Vaity on Stack Exchange at https://stackoverflow.com/questions/28176590/what-does-the-double-asterisk-wildcard-mean. I have not personally validated this to do your own homework.
Segments and Separators (/)
The separator is always the / character. A segment is everything that comes between the two separators.
Example: Tests/HelloWorld.js
Here, Tests and HelloWorld.js are the segments and / is the separator.
Single Asterisk (*)
Single Asterisk (*) matches zero or more characters within one segment. It is used for globbing the files within one directory.
Example: *.js
This glob will match files such as HelloWorld.js but not files like Tests/HelloWorld.js or Tests/UI/HelloWorld.js
Double Asterisk (**)
Double Asterisk (**) matches zero or more characters across multiple segments. It is used for globbing files that are in nested directories.
Example: Tests/**/*.js
Here, the file selecting will be restricted to the Tests directory. The glob will match the files such as Tests/HelloWorld.js, Tests/UI/HelloWorld.js, Tests/UI/Feature1/HelloWorld.js.
Question Mark(?)
Question mark(?) matches a single character within one segment. When some files or directories differ in their name by just one character, you can use the ?.
Example: tests/?at.js
This will match files such as tests/cat.js, test/Cat.js, test/bat.js etc.
Square Brackets ([abc])
Square Brackets ([...]) globs the files with a single character mentioned in the square brackets.
Example: tests/[CB]at.js
This glob will match files like tests/Cat.js or tests/Bat.js
Square Brackets Range ([a-z])
Square Brackets Range ([a-z]), matches one character specified in the range.
Example: tests/feature[1-9]/HelloWorld.js
This glob will match files like tests/feature1/HelloWorld.js, test/feature2/HelloWorld.js and so on… up to 9.
Negation (!)
Negation (!) can be used for excluding some files.
Example 1: tests/[!C]at.js
This will exclude the file tests/Cat.js and will match files like tests/Bat.js, tests/bat.js, tests/cat.js.
Negation is also used in configuration files inside an array to negate or exclude some files.
Example 2: ['Tests/**/*.js', '!Tests/UI/**']
This will exclude all files and folders from Tests/UI directory.
1.2 - Safer bash scripts with 'set -euxo pipefail'
Safer bash scripts, taken from Tom Van Eyck
The following post was sourced from Tom Van Eyck’s blog over at https://vaneyckt.io/posts/safer_bash_scripts_with_set_euxo_pipefail/. His last post was in 2018 and his github has been idle for as long so I’ve become worried that something might happen to his blog. Because I refer to this article so frequently, I have decided to preserve it here.
Often times developers go about writing bash scripts the same as writing code in a higher-level language. This is a big mistake as higher-level languages offer safeguards that are not present in bash scripts by default. For example, a Ruby script will throw an error when trying to read from an uninitialized variable, whereas a bash script won’t. In this article, we’ll look at how we can improve on this.
The bash shell comes with several builtin commands for modifying the behavior of the shell itself. We are particularly interested in the set builtin, as this command has several options that will help us write safer scripts. I hope to convince you that it’s a really good idea to add set -euxo pipefail to the beginning of all your future bash scripts.
set -e
The -e option will cause a bash script to exit immediately when a command fails. This is generally a vast improvement upon the default behavior where the script just ignores the failing command and continues with the next line. This option is also smart enough to not react on failing commands that are part of conditional statements. Moreover, you can append a command with || true for those rare cases where you don’t want a failing command to trigger an immediate exit.
Before
#!/bin/bash

# 'foo' is a non-existing command
foo
echo "bar"

# output
# ------
# line 4: foo: command not found
# bar
#
# Note how the script didn't exit when the foo command could not be found.
# Instead it continued on and echoed 'bar'.
After
#!/bin/bash
set -e

# 'foo' is a non-existing command
foo
echo "bar"

# output
# ------
# line 5: foo: command not found
#
# This time around the script exited immediately when the foo command wasn't found.
# Such behavior is much more in line with that of higher-level languages.
Any command returning a non-zero exit code will cause an immediate exit
#!/bin/bash
set -e

# 'ls' is an existing command, but giving it a nonsensical param will cause
# it to exit with exit code 1
$(ls foobar)
echo "bar"

# output
# ------
# ls: foobar: No such file or directory
#
# I'm putting this in here to illustrate that it's not just non-existing commands
# that will cause an immediate exit.
Preventing an immediate exit
#!/bin/bash
set -e

foo || true
$(ls foobar) || true
echo "bar"

# output
# ------
# line 4: foo: command not found
# ls: foobar: No such file or directory
# bar
#
# Sometimes we want to ensure that, even when 'set -e' is used, the failure of
# a particular command does not cause an immediate exit. We can use '|| true' for this.
Failing commands in a conditional statement will not cause an immediate exit
#!/bin/bash
set -e

# we make 'ls' exit with exit code 1 by giving it a nonsensical param
if ls foobar; then
  echo "foo"
else
  echo "bar"
fi

# output
# ------
# ls: foobar: No such file or directory
# bar
#
# Note that 'ls foobar' did not cause an immediate exit despite exiting with
# exit code 1. This is because the command was evaluated as part of a
# conditional statement.
That’s all for set -e. However, set -e by itself is far from enough. We can further improve upon the behavior created by set -e by combining it with set -o pipefail. Let’s have a look at that next.
set -o pipefail
The bash shell normally only looks at the exit code of the last command of a pipeline. This behavior is not ideal as it causes the -e option to only be able to act on the exit code of a pipeline’s last command. This is where -o pipefail comes in. This particular option sets the exit code of a pipeline to that of the rightmost command to exit with a non-zero status, or to zero if all commands of the pipeline exit successfully.
Before
#!/bin/bash
set -e

# 'foo' is a non-existing command
foo | echo "a"
echo "bar"

# output
# ------
# a
# line 5: foo: command not found
# bar
#
# Note how the non-existing foo command does not cause an immediate exit, as
# it's non-zero exit code is ignored by piping it with '| echo "a"'.
After
#!/bin/bash
set -eo pipefail

# 'foo' is a non-existing command
foo | echo "a"
echo "bar"

# output
# ------
# a
# line 5: foo: command not found
#
# This time around the non-existing foo command causes an immediate exit, as
# '-o pipefail' will prevent piping from causing non-zero exit codes to be ignored.
This section hopefully made it clear that -o pipefail provides an important improvement upon just using -e by itself. However, as we shall see in the next section, we can still do more to make our scripts behave like higher-level languages.
set -u
This option causes the bash shell to treat unset variables as an error and exit immediately. Unset variables are a common cause of bugs in shell scripts, so having unset variables cause an immediate exit is often highly desirable behavior.
Before
#!/bin/bash
set -eo pipefail

echo $a
echo "bar"

# output
# ------
#
# bar
#
# The default behavior will not cause unset variables to trigger an immediate exit.
# In this particular example, echoing the non-existing $a variable will just cause
# an empty line to be printed.
After
#!/bin/bash
set -euo pipefail

echo "$a"
echo "bar"

# output
# ------
# line 5: a: unbound variable
#
# Notice how 'bar' no longer gets printed. We can clearly see that '-u' did indeed
# cause an immediate exit upon encountering an unset variable.
Dealing with ${a:-b} variable assignments
Sometimes you’ll want to use a ${a:-b} variable assignment to ensure a variable is assigned a default value of b when a is either empty or undefined. The -u option is smart enough to not cause an immediate exit in such a scenario.
#!/bin/bash
set -euo pipefail

DEFAULT=5
RESULT=${VAR:-$DEFAULT}
echo "$RESULT"

# output
# ------
# 5
#
# Even though VAR was not defined, the '-u' option realizes there's no need to cause
# an immediate exit in this scenario as a default value has been provided.
Using conditional statements that check if variables are set
Sometimes you want your script to not immediately exit when an unset variable is encountered. A common example is checking for a variable’s existence inside an if statement.
#!/bin/bash
set -euo pipefail

if [ -z "${MY_VAR:-}" ]; then
  echo "MY_VAR was not set"
fi

# output
# ------
# MY_VAR was not set
#
# In this scenario we don't want our program to exit when the unset MY_VAR variable
# is evaluated. We can prevent such an exit by using the same syntax as we did in the
# previous example, but this time around we specify no default value.
This section has brought us a lot closer to making our bash shell behave like higher-level languages. While -euo pipefail is great for the early detection of all kinds of problems, sometimes it won’t be enough. This is why in the next section we’ll look at an option that will help us figure out those really tricky bugs that you encounter every once in a while.
set -x
The -x option causes bash to print each command before executing it. This can be a great help when trying to debug a bash script failure. Note that arguments get expanded before a command gets printed, which will cause our logs to contain the actual argument values that were present at the time of execution!
#!/bin/bash
set -euxo pipefail

a=5
echo $a
echo "bar"

# output
# ------
# + a=5
# + echo 5
# 5
# + echo bar
# bar
That’s it for the -x option. It’s pretty straightforward, but can be a great help for debugging. Next up, we’ll look at an option I had never heard of before that was suggested by a reader of this blog.
Reader suggestion: set -E
Traps are pieces of code that fire when a bash script catches certain signals. Aside from the usual signals (e.g. SIGINT, SIGTERM, …), traps can also be used to catch special bash signals like EXIT, DEBUG, RETURN, and ERR. However, reader Kevin Gibbs pointed out that using -e without -E will cause an ERR trap to not fire in certain scenarios.
Before
#!/bin/bash
set -euo pipefail

trap "echo ERR trap fired!" ERR

myfunc()
{
  # 'foo' is a non-existing command
  foo
}

myfunc
echo "bar"

# output
# ------
# line 9: foo: command not found
#
# Notice that while '-e' did indeed cause an immediate exit upon trying to execute
# the non-existing foo command, it did not case the ERR trap to be fired.
After
#!/bin/bash
set -Eeuo pipefail

trap "echo ERR trap fired!" ERR

myfunc()
{
  # 'foo' is a non-existing command
  foo
}

myfunc
echo "bar"

# output
# ------
# line 9: foo: command not found
# ERR trap fired!
#
# Not only do we still have an immediate exit, we can also clearly see that the
# ERR trap was actually fired now.
The documentation states that -E needs to be set if we want the ERR trap to be inherited by shell functions, command substitutions, and commands that are executed in a subshell environment. The ERR trap is normally not inherited in such cases.
Conclusion
I hope this post showed you why using set -euxo pipefail (or set -Eeuxo pipefail) is such a good idea. If you have any other options you want to suggest, then please let me know and I’ll be happy to add them to this list.
1.3 - Scratch Pad
A scratch pad for random notes
jq '.prefixes[] | select(.region=="us-gov-east-1") | select(.service=="EC2")' < ~/Downloads/ip-ranges.json
https://docs.aws.amazon.com/general/latest/gr/aws-ip-ranges.html
1.4 - Pulumi
How to use Pulumi. This is a WIP.
2 - Encryption
All things encryption related.
2.1 - OpenSSL Cheat Sheet
OpenSSL command cheat sheet
Certificate types
X509
PEM
PEM (originally “Privacy Enhanced Mail”) is the most common format for X.509 certificates, CSRs, and cryptographic keys. A PEM file is a text file containing one or more items in Base64 ASCII encoding, each with plain-text headers and footers (e.g. -----BEGIN CERTIFICATE----- and -----END CERTIFICATE-----). A single PEM file could contain an end-entity certificate, a private key, or multiple certificates forming a complete chain of trust.
(Source: SSL.com)
Common file extensions are .crt, .cer, .pem, .key, ca-bundle.
View contents of the certificate in CERTIFICATE_FILE:
openssl x509 -in CERTIFICATE_FILE -text -noout
Convert PEM to DER:
openssl x509 -outform der -in PEM_FILE -out DER_FILE
Convert PEM to PKCS#7:
openssl crl2pkcs7 -nocrl -certfile CERTIFICATE_PEM_FILE -certfile CA_CHAIN_PEM_FILE -out OUTPUT_FILE
Convert PEM to PKCS#12:
openssl pkcs12 -export -out CERTIFICATE_FILE -inkey PRIVATE_KEY_FILE -in CERTIFICATE -certfile CA_CHAIN
DER
DER (Distinguished Encoding Rules) is a binary encoding for X.509 certificates and private keys. Unlike PEM, DER-encoded files do not contain plain text statements such as -----BEGIN CERTIFICATE-----. DER files are most commonly seen in Java contexts.
(Source: SSL.com)
Common file extensions are .der and .cer.
View contents of CERTIFICATE_DER_FILE:
openssl x509 -inform der -in CERTIFICATE_DER_FILE -text -noout
Convert CERTIFICATE_DER_FILE to a PEM:
openssl x509 -inform der -in CERTIFICATE_DER_FILE -out CERTIFICATE_PEM_FILE
Certificate container formats
PKCS#7
PKCS#7 (also known as P7B) is a container format for digital certificates that is most often found in Windows and Java server contexts, and usually has the extension .p7b. PKCS#7 files are not used to store private keys.
PKCS#12
PKCS#12 (also known as PKCS12 or PFX) is a common binary format for storing a certificate chain and private key in a single, encryptable file, and usually have the filename extensions .p12 or .pfx.
Convert PKCS to x509
Extract the private key:
openssl pkcs12 -in P12_CERT_FILE -out X509_KEY_FILE -nocerts -nodes
Extra the certificate alone:
openssl pkcs12 -in P12_CERT_FILE -out X509_CERT_FILE -nokeys -nodes -clcerts
Extract the certificate and the CA chain:
openssl pkcs12 -in P12_CERT_FILE -out X509_CERT_FILE -nokeys -nodes
Extract the CA chain:
openssl pkcs12 -in P12_CERT_FILE -out X509_CA_CHAIN_FILE -nokeys -cacerts -chain
Handy commands
Misc commands
Get an x509 secret from Kubernetes and output details:
kubectl get secret SECRET_NAME -ojson | jq -r '.data."KEY"' | base64 -d | openssl x509 -text
Create a self signed X.509 certificate:
openssl req -x509 -nodes -newkey rsa:4096 -keyout "PRIVATE_KEY_FILE" -out "PUBLIC_KEY_FILE" -subj "SUBJECT"
Extract the client key and pass to AWK to remove all newline characters:
openssl pkcs12 -in PKCS12_FILE -clcerts -nokeys -password pass:PASSWORD | awk 'NF {sub(/\r/, ""); printf "%s\\n",$0;}'| option | arg | explanation |
|---|---|---|
| -in | file | Input file to read from. STDIN if not provided |
| -clcerts | Only output client certificates (not CA certs) | |
| -nokeys | Do not output private keys | |
| -password | not found in linux or mac openssl | |
| pass:password | Where password is the password |
3 - Git
Git from zero to hero. Basic to advanced concepts along with examples and tutorials.
3.1 - The Working Tree and Stashing
Working with the Working Tree and how to stash. This page is a WIP
git stash -h- get helpgit stashgit stash -u- also stashes untracked changesgit stash -a- also stashes ignored filesgit stash save "message"- add annotation to stashgit stash list- show all stashesgit stash show stash@{0}- Show changed files in a stashgit stash show -p- Shows diffgit stash show -v stash@{0}- Show actual changesgit stash pop- empty the stash and apply changesgit stash apply- apply changes and keep them in your stash. Useful if you want to apply changes to multiple branches.git stash clear- delete all stashesgit stash drop stash@{0}- delete a single stash
3.2 - Git Tagging
How to create and handle tags in Git.
Creating tags
There are two types of tags, lightweight and annotated. The following explanation was taken from a Stack Overflow post:
A lightweight tag is very much like a branch that doesn’t change - it’s just a pointer to a specific commit.
Annotated tags, however, are stored as full objects in the Git database. They’re checksummed; contain the tagger name, email, and date; have a tagging message; and can be signed and verified with GNU Privacy Guard (GPG). It’s generally recommended that you create annotated tags so you can have all this information; but if you want a temporary tag or for some reason don’t want to keep the other information, lightweight tags are available too.
Create lightweight tag
git tag TAG
Create annotated tag
git tag -a TAG -m COMMIT MESSAGE
Handling tags
Pushing new tags
git push origin TAG
Deleting local tags
git tag -d TAG
Deleting remote tags
git push origin --delete TAG
Listing tags
git tag
Sorting output
Use the sort switch --sort=<type>, where type can be:
refname: lexicographic orderversion:refnameorv:refname: tag names are treated as versionsReverse order
Prepend type with-to reverse order.
Examples
Lexical sort
$ git tag -l --sort=refname "foo*"
foo1.10
foo1.3
foo1.6
Version sort
$ git tag -l --sort=version:refname "foo*"
foo1.10
foo1.6
foo1.3
Reverse version sort
$ git tag -l --sort=-version:refname "foo*"
foo1.10
foo1.6
foo1.3
Reverse lexical sort
$ git tag -l --sort=-refname "foo*"
foo1.6
foo1.3
foo1.10
3.3 - Git Commands
Various git commands. This is a WIP.
This is a WIP
git-add
git-commit
git-merge
git-log
git log --onelinegit log --statgit log -pgit shortlog- groups commits by usergit log --graph --oneline --decorate- the golden command
Additional resources: https://www.atlassian.com/git/tutorials/git-log
git-blame
git-diff
git-show
Show information about various objects
git-restore
Restore a file from a previous commit
git restore --source HEAD~1 FILE_NAME
Restore a file from HEAD
git restore FILE_NAME
Restore all files in the current directory from HEAD
git restore .
git-reset
git reset --soft COMMIT
git reset --hard COMMIT
Removing a commit
Delete the last commit: git reset --hard HEAD~1
Force push the changes: git push -f remote branch
3.4 - Git Configuration
How to configure git.
Configuration
Git configuration location
There are three places where configuration is stored:
- System:
path/etc/gitconfig - Global:
~/.gitconfigor/.config/git/config - Local:
repo/.git/config
When using the git config command you can pass --system, --global, or --local to specify which configuration you’d like to modify. The list above is in order of precedence from lowest to highest. Values in the local config will override values in global and system. Values in global will override values in system.
To show all configurations and their source execute git config --list --show-origin
How to use git-config
To see the man page, which is really good for this command, execute man git-config. The “name” of the option to affect is the section and key separated by a period (e.g. alias.br).
There are several options query/set/replace/unset.
To create git config alias.br 'branch -a'
To unset git config --unset alias.br
Required configurations
In order to commit in a repo you’ll need to ensure that two values are set at some configuration level:
- Email:
git config –global user.name “USER-NAME" - Username:
git config –global user.email “EMAIL"
Aliases
A very useful configuration is an alias. It allows you to create a short alias for a long command. Another benefit is having an alias is like having notes you can look up when you forget a seldom used command.
To create an alias git config –global alias.ALIAS-NAME COMMAND
An example would be to set git br to git branch -a
$ git config --global alias.br 'branch -a'
3.5 - Git Branching
Branching concepts and commands.
The first thing to understand about Git is it’s a distributed Source Control Manager (SCM). This means that the repository isn’t stored in a central location. It’s stored on every developer’s computer. When it was first created this was how it was used. We now have a feature called a remote that has become ubiquitous. A remote is commonly a Git server which can store your repository in a central place for all developers on your team to access. The first step in working with Git is almost always cloning.
Clone a repo
Cloning a repo is the act of downloading a copy of the repo to your local machine so you can work on it. The git clone command will create a new sub directory within your present working directory and clone the repo to it. To clone a repo using the HTTPS protocol:
$ git clone https://github.com/JamesCacioppo/git-zero-to-hero-demo.git
To clone a repo using SSH:
$ git clone git@github.com:JamesCacioppo/git-zero-to-hero-demo.git
Remotes
Display configured remotes:
$ git remote -v
origin  git@github.com:JamesCacioppo/JamesCacioppo.github.io.git (fetch)
origin  git@github.com:JamesCacioppo/JamesCacioppo.github.io.git (push)
To add a remote:
git remote add upstream URL
To change a local branch’s upstream tracking:
git branch --set-upstream-to REMOTE_NAME/BRANCH_NAME
$ git branch --set-upstream-to origin/main
branch 'main' set up to track 'origin/main'.
Branching
When you first clone a repo you’ll be in the default branch. This was historically called master and is now often named main. Most organizations use a branching strategy which usually involves creating a branch, committing changes to the branch, and then merging that branch back into main.
Creating Branches
The formal way to create a branch is with the git-branch command:
git branch BRANCH-NAME
However, the previous command does not place you on that branch and you’d still need to use the git-checkout command to switch branches. To create a branch and switch to it in one command use git-checkout:
git checkout -b BRANCH-NAME
At this point your local repo is tracking the new branch but the remote is not. To update the remote:
git push --set-upstream origin BRANCH-NAME
Useful Branching Commands
To list local branches: git branch
To list branches locally and remotely: git branch -a
To rename the current branch: git branch -m BRANCH-NAME
To checkout a branch use: git checkout BRANCH-NAME
git-checkout
The git-checkout command only moves the HEAD pointer, not the branch pointer. This is different from git-reset.Deleting Branches
When it comes time to delete a branch there are a few things to note.
- Deleting a branch locally is different from deleting a branch on the remote.
- There are two ways to remove a branch locally listed below.
- The “safe” way will only remove the branch if its changes have been merged into main while the “forcefull” method will remove the branch regardless of its status.
- You cannot remove a branch if you have it checked out.
- When you delete a remote branch your local repo does not know and will need to be updated. To do this you must remove the branch refs.
To safely remove a local branch use git branch -d BRANCH-NAME
To forcefully remove a local branch use git branch -D BRANCH-NAME
To remove a remote branch use git push origin –delete BRANCH-NAME
To remove deleted branch refs use git remote prune origin
Branching Strategies
When a team is using Git, some sort of workflow or branching strategy is required for the team to develop effectively. Junior developers need an understanding of various common strategies so they can onboard quickly to various teams and projects. Intermediate and senior developers will need a more in-depth understanding of the common strategies, their variants, benefits and drawbacks of each, and when to choose one strategy over another. What follows is just a brief introduction into a few common strategies.
Gitflow
In 2010, Vincent Driessen documented Gitflow. In a vacuum of well documented and capable strategies, Gitflow became almost ubiquitous in development teams and is still almost required knowledge. While this strategy works well under certain conditions, Gitflow has many drawbacks. In fact, Vincent even updated his post in 2020 explaining that it shouldn’t necessarily be the default or go-to for all dev teams. We’ll discuss some of the pro’s and con’s of Gitflow, but first, let’s take a look at how it works.

Two branches live forever. They are develop and master. The develop branch is the branch from which almost all work is done. Developers will create feature branches from develop and merge their work back in.
Developers will also create release branches from develop. The purpose of creating these is to start preparing code for release or production deployment. Once this prep work is complete, release branches will be merged into master.
Bug and hotfix branches will be created from master and when complete they will be merged back into master as well as develop.
As you can see, this is a complex strategy which can result in some interesting merge conflicts. It also does not facilitate CI/CD.
There are circumstances, however, where releasing and deploying at a high frequency is undesirable or impossible. In these cases, this strategy can be helpful as there’s a natural delay between selecting a release candidate and a push to production. The dedicated release branch allows developers to fix issues with the release candidate while continuing development of the baseline on develop.
Github flow
Github flow, designed by Github, is meant to provide many of the benefits seen in Gitflow while massively reducing complexity. Their documentation is clear and concise and definitely worth a look.

In Github flow, there is only one long lived branch and it’s the main branch. All working branches come from main and merge back into main. This includes branches for features, ops updates, bug and hot fixes, etc. When a commit on master is chosen for release a version tag is applied to it.
This strategy is very flexible. Testing can be done at any point. In fact, we’ve found that it’s effective to perform builds, deployments, and testing when a PR is created and on each subsequent commit which changes a PR. Then, we perform the same and more testing when merged back into main, build and push artifacts, and deploy into UAT environments.
Trunk
One of the main issues with many common strategies is the rate of integration. Continuous Integration (CI) means integrating, or merging, code back into the mainline as frequently as possible. In Gitflow, Github flow, and other similar strategies, developers commonly keep feature branches open for days if not entire sprints. What often results is sometimes called “integration hell” or “merge hell” as developers attempt to merge their code, which has become further and further out of date from the mainline as time has passed.
Enter Trunk Based workflows.
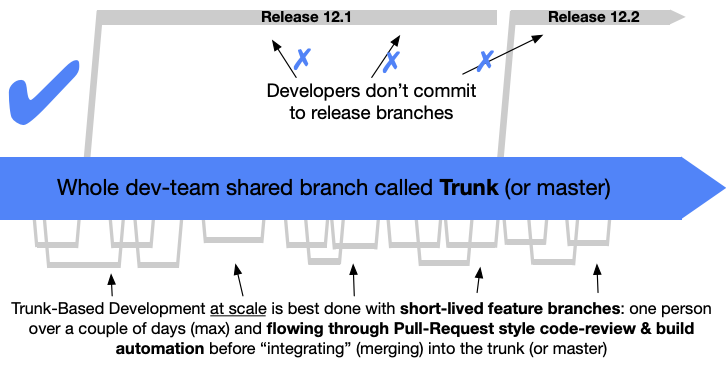
The idea is that code is integrated into the mainline as often as every commit and at least once every 24 hours. Small two dev teams who are paired programming may commit directly to master while larger “at scale” teams will need to use feature branches. The key difference here is that feature branches should be very short lived and should be integrated at least once every 24 hours.
In order for this to work, thorough testing must be conducted before merging using various methods such as pre-commit hooks and the baseline should be kept in good working condition. If a bug is found in the baseline fixing it should be the priority.
A great resource is the site at ContinuousDelivery.com. The page on Continuous Integration is especially relevant to this topic.
4 - Kube Bench
Set up kube-bench to perform scans and export the results.
The BLUF
How to set up kube-bench scans and export reports in an EKS cluster.
The long description
Running kube-bench scans as a k8s job against an EKS cluster is a pretty simple task. Even setting kube-bench up as a cron job is a fairly simple task. The issue arises when you have to do something with the results of the scan.
The answer we settled on was executing kube-bench as an init container, saving stdout to a file on a pvc, mounting the pvc to the AWS CLI container, and pushing the file to an S3 bucket. Our decisions were driven by a requirement which dictated that the reports be made available to a third party who would process them in a manner of their choosing.
The kube-bench tool can output files in JSON and JUNIT formats. For my purposes, the best solution is to take a JSON file and push it to an S3 bucket where it can be stored, retrieved, and fed into another system. In an ideal world you’d want to push the output directly into a system under your control. In many cases you just have to make the results available to another party.
The process can be broken down into two main components: configuring AWS and configuring Kubernetes resources.
Configuring AWS
Create an S3 bucket
Name it kluster-bucket
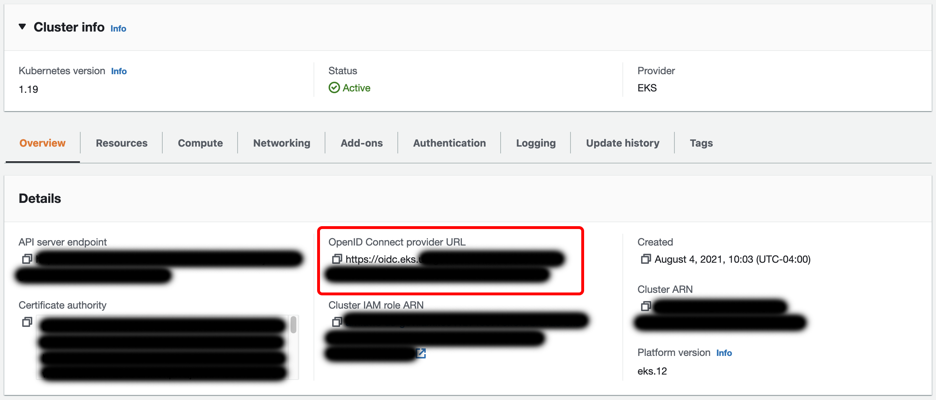
Create Identity provider
An identity provider tied to the cluster’s OIDC provider is required to link AWS IAM to Kubernetes access control. In many cases, you may already have one in place. If not, follow these steps:
- Copy the OpenID Connect provider URL from the cluster details at EKS > Clusters >
cluster name - Go to IAM -> Identity providers and click Add Provider
- Select OpenID Connect, enter the Provider URL copied from the cluster details in step 1, and select sts.amazonaws.com in Audience.
Create an IAM Policy
Create an IAM policy allowing write access to a specific S3 bucket:
{
 “Version”: “2012–10–17”,
 “Statement”: [
    {
      “Effect”: “Allow”,
      “Action”: [
               “s3:PutObject”
       ],
       “Resource”: “arn:aws:s3:::kluster-bucket/*”
    }
 ]
}
Create an IAM Role
- Go to IAM > Roles
- Click Create Role
- Select Web identity for Trusted entity type
- Under Identity provider, select the OIDC Identity provider created earlier
- Select sts.amazonaws.com for Audience
- Add the S3 IAM policy created earlier
- Name and finalize the role. For our purposes, we’ll name the role kluster-s3-write-access
Tie the role to a specific K8s namespace and service account (optional)
In the new role, edit the trust relationship. The dictionary Statement.Condition.StringEquals will have a key for the OIDC identity provider ending in aud and a value of sts.amazon.com. Update these to sub and system:serviceaccount:namespace name:service account name respectively. They should look as follows:
{
  "Version": "2012-10-17",
  "Statement": [
    {
      "Effect": "Allow",
      "Principal": {
        "Federated": "arn:aws:iam::123456789012:oidc-provider/oidc.eks.us-east-1.amazonaws.com/id/1234567890AABBCCDDEEFF1234568901"
      },
      "Action": "sts:AssumeRoleWithWebIdentity",
      "Condition": {
        "StringEquals": {
          "oidc.eks.us-east-1.amazonaws.com/id/1234567890AABBCCDDEEFF1234568901:sub": "system:serviceaccount:saymynamespace:s3-write"
        }
      }
    }
  ]
}
Configuring Kubernetes
Create a K8s service account
Create a service account in the kube-bench namespace. This service account ties to the AWS IAM role created earlier as follows:
apiVersion: v1
kind: ServiceAccount
metadata:
  name: s3-write
	namespace: kube-bench
  annotations:
    eks.amazonaws.com/role-arn: arn:aws:iam::123456789012:role/kluster-s3-write-access
Create a K8s Cronjob
Create a Cronjob as follows:
apiVersion: batch/v1beta1
kind: CronJob
metadata:
  name: kube-bench
  namespace: kube-bench
spec:
  schedule: "0 10 * * *"
  jobTemplate:
    spec:
      template:
        spec:
          hostPID: true
          containers:
          - name: s3-push
            image: amazon/aws-cli:2.7.29
            command:
              [
                "bash",
                "-c",
                'aws s3 cp /report/kube-bench-report s3://kluster-bucket/kube-bench-report-$(date -u +%Y-%m-%dT%H.%M.%S)'
              ]
            volumeMounts:
            - name: empty-dir
              mountPath: /report
          initContainers:
          - name: kube-bench
            image: aquasec/kube-bench:v0.6.0
            imagePullPolicy: IfNotPresent
            command:
              [
                "kube-bench",
                "run",
                "--targets",
                "node",
                "--benchmark",
                "eks-1.0.1",
                "--json",
                "--outputfile",
                "/report/kube-bench-report"
              ]
            volumeMounts:
            - name: var-lib-kubelet
              mountPath: /var/lib/kubelet
              readOnly: true
            - name: etc-systemd
              mountPath: /etc/systemd
              readOnly: true
            - name: etc-kubernetes
              mountPath: /etc/kubernetes
              readOnly: true
            - name: empty-dir
              mountPath: /report
          serviceAccountName: s3-write
          restartPolicy: Never
          volumes:
          - name: var-lib-kubelet
            hostPath:
              path: "/var/lib/kubelet"
          - name: etc-systemd
            hostPath:
              path: "/etc/systemd"
          - name: etc-kubernetes
            hostPath:
              path: "/etc/kubernetes"
          - name: empty-dir
            emptyDir: {}
5 - Python
Python notes for myself as I learn the language.
5.1 - venv
venv
Create a dir (and any subdirs) and place a pyvenv.cfg as well as a bin dir.
python -m venv PATH
For example:
python -m venv .venv
To activate the virtual environment:
source PATH/bin/activate
To deactivate the virtual environment:
deactivate
5.2 - Pytest
Pytest
To install:
pip install pytest
To execute:
pytest
Pytest will run the tests in any file prefixed with test_.
5.3 - Pyenv
How to install and configure Pyenv. This is a WIP.
Install pyenv:
brew update
brew install pyenv
Configure pyenv:
echo 'export PYENV_ROOT="$HOME/.pyenv"' >> ~/.zshrc
echo 'command -v pyenv >/dev/null || export PATH="$PYENV_ROOT/bin:$PATH"' >> ~/.zshrc
echo 'eval "$(pyenv init -)"' >> ~/.zshrc
Install build deps of MacOS: brew install openssl readline sqlite3 xz zlib tcl-tk
List available versions: pyenv install -l
Install a version: pyenv install version
Set a global version to use: pyenv global version
There are three ways to set the python version to be used:
- Select just for current shell session:
pyenv shell version - Automatically select whenever you are in the current directory (or its subdirectories):
pyenv local version - Select globally for your user account:
pyenv global version
6 - Markdown
A complete breakdown of widely accepted Markdown
This is a placeholder page. Replace it with your own content.
Text can be bold, italic, or strikethrough. Links should be blue with no underlines (unless hovered over).
There should be no margin above this first sentence.
Blockquotes should be a lighter gray with a border along the left side in the secondary color.
There should be no margin below this final sentence.
General Styling
This is a normal paragraph following a header.
On big screens, paragraphs and headings should not take up the full container width, but we want tables, code blocks and similar to take the full width.
Second Header 2
This is a blockquote following a header. Bacon ipsum dolor sit amet t-bone doner shank drumstick, pork belly porchetta chuck sausage brisket ham hock rump pig. Chuck kielbasa leberkas, pork bresaola ham hock filet mignon cow shoulder short ribs biltong.
Header 3
This is a code block following a header.
Header 4
- This is an unordered list following a header.
- This is an unordered list following a header.
- This is an unordered list following a header.
Header 5
- This is an ordered list following a header.
- This is an ordered list following a header.
- This is an ordered list following a header.
Header 6
| What | Follows |
|---|---|
| A table | A header |
| A table | A header |
| A table | A header |
There’s a horizontal rule above and below this.
Here is an unordered list:
- Liverpool F.C.
- Chelsea F.C.
- Manchester United F.C.
And an ordered list:
- Michael Brecker
- Seamus Blake
- Branford Marsalis
And an unordered task list:
- Create a Hugo theme
- Add task lists to it
- Take a vacation
And a “mixed” task list:
- Pack bags
- ?
- Travel!
And a nested list:
- Jackson 5
- Michael
- Tito
- Jackie
- Marlon
- Jermaine
- TMNT
- Leonardo
- Michelangelo
- Donatello
- Raphael
Definition lists can be used with Markdown syntax. Definition headers are bold.
- Name
- Godzilla
- Born
- 1952
- Birthplace
- Japan
- Color
- Green
Tables should have bold headings and alternating shaded rows.
| Artist | Album | Year |
|---|---|---|
| Michael Jackson | Thriller | 1982 |
| Prince | Purple Rain | 1984 |
| Beastie Boys | License to Ill | 1986 |
If a table is too wide, it should scroll horizontally.
| Artist | Album | Year | Label | Awards | Songs |
|---|---|---|---|---|---|
| Michael Jackson | Thriller | 1982 | Epic Records | Grammy Award for Album of the Year, American Music Award for Favorite Pop/Rock Album, American Music Award for Favorite Soul/R&B Album, Brit Award for Best Selling Album, Grammy Award for Best Engineered Album, Non-Classical | Wanna Be Startin’ Somethin’, Baby Be Mine, The Girl Is Mine, Thriller, Beat It, Billie Jean, Human Nature, P.Y.T. (Pretty Young Thing), The Lady in My Life |
| Prince | Purple Rain | 1984 | Warner Brothers Records | Grammy Award for Best Score Soundtrack for Visual Media, American Music Award for Favorite Pop/Rock Album, American Music Award for Favorite Soul/R&B Album, Brit Award for Best Soundtrack/Cast Recording, Grammy Award for Best Rock Performance by a Duo or Group with Vocal | Let’s Go Crazy, Take Me With U, The Beautiful Ones, Computer Blue, Darling Nikki, When Doves Cry, I Would Die 4 U, Baby I’m a Star, Purple Rain |
| Beastie Boys | License to Ill | 1986 | Mercury Records | noawardsbutthistablecelliswide | Rhymin & Stealin, The New Style, She’s Crafty, Posse in Effect, Slow Ride, Girls, (You Gotta) Fight for Your Right, No Sleep Till Brooklyn, Paul Revere, Hold It Now, Hit It, Brass Monkey, Slow and Low, Time to Get Ill |
Code snippets like var foo = "bar"; can be shown inline.
Also, this should vertically align with thisand this.
Code can also be shown in a block element.
foo := "bar";
bar := "foo";
Code can also use syntax highlighting.
func main() {
  input := `var foo = "bar";`

  lexer := lexers.Get("javascript")
  iterator, _ := lexer.Tokenise(nil, input)
  style := styles.Get("github")
  formatter := html.New(html.WithLineNumbers())

  var buff bytes.Buffer
  formatter.Format(&buff, style, iterator)

  fmt.Println(buff.String())
}
Long, single-line code blocks should not wrap. They should horizontally scroll if they are too long. This line should be long enough to demonstrate this.
Inline code inside table cells should still be distinguishable.
| Language | Code |
|---|---|
| Javascript | var foo = "bar"; |
| Ruby | foo = "bar"{ |
Small images should be shown at their actual size.

Large images should always scale down and fit in the content container.

The photo above of the Spruce Picea abies shoot with foliage buds: Bjørn Erik Pedersen, CC-BY-SA.
Components
Alerts
This is an alert.
Note
This is an alert with a title.Note
This is an alert with a title and Markdown.This is a successful alert.
This is a warning.
Warning
This is a warning with a title.Another Heading
Add some sections here to see how the ToC looks like. Bacon ipsum dolor sit amet t-bone doner shank drumstick, pork belly porchetta chuck sausage brisket ham hock rump pig. Chuck kielbasa leberkas, pork bresaola ham hock filet mignon cow shoulder short ribs biltong.
This Document
Inguina genus: Anaphen post: lingua violente voce suae meus aetate diversi. Orbis unam nec flammaeque status deam Silenum erat et a ferrea. Excitus rigidum ait: vestro et Herculis convicia: nitidae deseruit coniuge Proteaque adiciam eripitur? Sitim noceat signa probat quidem. Sua longis fugatis quidem genae.
Pixel Count
Tilde photo booth wayfarers cliche lomo intelligentsia man braid kombucha vaporware farm-to-table mixtape portland. PBR&B pickled cornhole ugh try-hard ethical subway tile. Fixie paleo intelligentsia pabst. Ennui waistcoat vinyl gochujang. Poutine salvia authentic affogato, chambray lumbersexual shabby chic.
Contact Info
Plaid hell of cred microdosing, succulents tilde pour-over. Offal shabby chic 3 wolf moon blue bottle raw denim normcore poutine pork belly.
External Links
Stumptown PBR&B keytar plaid street art, forage XOXO pitchfork selvage affogato green juice listicle pickled everyday carry hashtag. Organic sustainable letterpress sartorial scenester intelligentsia swag bushwick. Put a bird on it stumptown neutra locavore. IPhone typewriter messenger bag narwhal. Ennui cold-pressed seitan flannel keytar, single-origin coffee adaptogen occupy yuccie williamsburg chillwave shoreditch forage waistcoat.
This is the final element on the page and there should be no margin below this.