Git Branching
Categories:
The first thing to understand about Git is it’s a distributed Source Control Manager (SCM). This means that the repository isn’t stored in a central location. It’s stored on every developer’s computer. When it was first created this was how it was used. We now have a feature called a remote that has become ubiquitous. A remote is commonly a Git server which can store your repository in a central place for all developers on your team to access. The first step in working with Git is almost always cloning.
Clone a repo
Cloning a repo is the act of downloading a copy of the repo to your local machine so you can work on it. The git clone command will create a new sub directory within your present working directory and clone the repo to it. To clone a repo using the HTTPS protocol:
$ git clone https://github.com/JamesCacioppo/git-zero-to-hero-demo.git
To clone a repo using SSH:
$ git clone git@github.com:JamesCacioppo/git-zero-to-hero-demo.git
Remotes
Display configured remotes:
$ git remote -v
origin  git@github.com:JamesCacioppo/JamesCacioppo.github.io.git (fetch)
origin  git@github.com:JamesCacioppo/JamesCacioppo.github.io.git (push)
To add a remote:
git remote add upstream URL
To change a local branch’s upstream tracking:
git branch --set-upstream-to REMOTE_NAME/BRANCH_NAME
$ git branch --set-upstream-to origin/main
branch 'main' set up to track 'origin/main'.
Branching
When you first clone a repo you’ll be in the default branch. This was historically called master and is now often named main. Most organizations use a branching strategy which usually involves creating a branch, committing changes to the branch, and then merging that branch back into main.
Creating Branches
The formal way to create a branch is with the git-branch command:
git branch BRANCH-NAME
However, the previous command does not place you on that branch and you’d still need to use the git-checkout command to switch branches. To create a branch and switch to it in one command use git-checkout:
git checkout -b BRANCH-NAME
At this point your local repo is tracking the new branch but the remote is not. To update the remote:
git push --set-upstream origin BRANCH-NAME
Useful Branching Commands
To list local branches: git branch
To list branches locally and remotely: git branch -a
To rename the current branch: git branch -m BRANCH-NAME
To checkout a branch use: git checkout BRANCH-NAME
git-checkout
The git-checkout command only moves the HEAD pointer, not the branch pointer. This is different from git-reset.Deleting Branches
When it comes time to delete a branch there are a few things to note.
- Deleting a branch locally is different from deleting a branch on the remote.
- There are two ways to remove a branch locally listed below.
- The “safe” way will only remove the branch if its changes have been merged into main while the “forcefull” method will remove the branch regardless of its status.
- You cannot remove a branch if you have it checked out.
- When you delete a remote branch your local repo does not know and will need to be updated. To do this you must remove the branch refs.
To safely remove a local branch use git branch -d BRANCH-NAME
To forcefully remove a local branch use git branch -D BRANCH-NAME
To remove a remote branch use git push origin –delete BRANCH-NAME
To remove deleted branch refs use git remote prune origin
Branching Strategies
When a team is using Git, some sort of workflow or branching strategy is required for the team to develop effectively. Junior developers need an understanding of various common strategies so they can onboard quickly to various teams and projects. Intermediate and senior developers will need a more in-depth understanding of the common strategies, their variants, benefits and drawbacks of each, and when to choose one strategy over another. What follows is just a brief introduction into a few common strategies.
Gitflow
In 2010, Vincent Driessen documented Gitflow. In a vacuum of well documented and capable strategies, Gitflow became almost ubiquitous in development teams and is still almost required knowledge. While this strategy works well under certain conditions, Gitflow has many drawbacks. In fact, Vincent even updated his post in 2020 explaining that it shouldn’t necessarily be the default or go-to for all dev teams. We’ll discuss some of the pro’s and con’s of Gitflow, but first, let’s take a look at how it works.

Two branches live forever. They are develop and master. The develop branch is the branch from which almost all work is done. Developers will create feature branches from develop and merge their work back in.
Developers will also create release branches from develop. The purpose of creating these is to start preparing code for release or production deployment. Once this prep work is complete, release branches will be merged into master.
Bug and hotfix branches will be created from master and when complete they will be merged back into master as well as develop.
As you can see, this is a complex strategy which can result in some interesting merge conflicts. It also does not facilitate CI/CD.
There are circumstances, however, where releasing and deploying at a high frequency is undesirable or impossible. In these cases, this strategy can be helpful as there’s a natural delay between selecting a release candidate and a push to production. The dedicated release branch allows developers to fix issues with the release candidate while continuing development of the baseline on develop.
Github flow
Github flow, designed by Github, is meant to provide many of the benefits seen in Gitflow while massively reducing complexity. Their documentation is clear and concise and definitely worth a look.

In Github flow, there is only one long lived branch and it’s the main branch. All working branches come from main and merge back into main. This includes branches for features, ops updates, bug and hot fixes, etc. When a commit on master is chosen for release a version tag is applied to it.
This strategy is very flexible. Testing can be done at any point. In fact, we’ve found that it’s effective to perform builds, deployments, and testing when a PR is created and on each subsequent commit which changes a PR. Then, we perform the same and more testing when merged back into main, build and push artifacts, and deploy into UAT environments.
Trunk
One of the main issues with many common strategies is the rate of integration. Continuous Integration (CI) means integrating, or merging, code back into the mainline as frequently as possible. In Gitflow, Github flow, and other similar strategies, developers commonly keep feature branches open for days if not entire sprints. What often results is sometimes called “integration hell” or “merge hell” as developers attempt to merge their code, which has become further and further out of date from the mainline as time has passed.
Enter Trunk Based workflows.
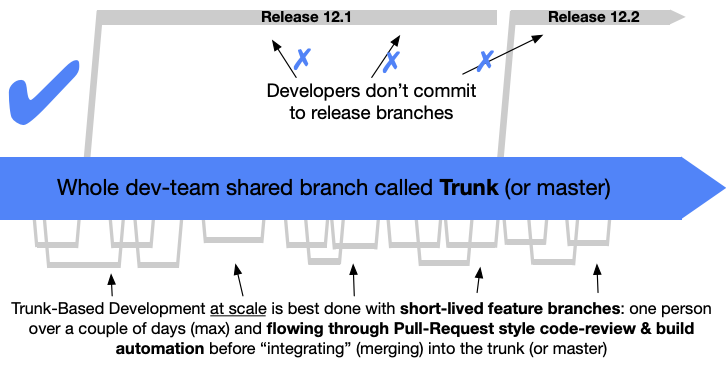
The idea is that code is integrated into the mainline as often as every commit and at least once every 24 hours. Small two dev teams who are paired programming may commit directly to master while larger “at scale” teams will need to use feature branches. The key difference here is that feature branches should be very short lived and should be integrated at least once every 24 hours.
In order for this to work, thorough testing must be conducted before merging using various methods such as pre-commit hooks and the baseline should be kept in good working condition. If a bug is found in the baseline fixing it should be the priority.
A great resource is the site at ContinuousDelivery.com. The page on Continuous Integration is especially relevant to this topic.